

Becoming a professional at anything is always challenging. For artists in particular, it takes a long time to perfect their technique and develop their own style.
However, this shouldn’t discourage you from practicing and molding your skills into what you wish them to be.
While we know that you always have to start somewhere, many tutorials and guides can help you in your venture. One such guide is how to draw eyes by BIOWARS. There is even a video that will help you visualize everything more clearly.
Without further ado, let’s dive into the magical process of learning to draw a portrait professionally.
What You Need to Know Before Starting
While we can say that anyone can do a professionally drawn portrait, it is not a lie, but it does require experience and practice.
You can start with the basics and then slowly advance your skills. However, it will be easier if you have previous experience drawing portraits.
Whether you drew caricatures, or characters from animated movies, anime, or even from books, these will all contribute to your realistic and professional portrait journey.
This all being said, if you are a beginner, please do not be scared. Take one step at a time, and we will guide you through the entire process.
Prepping the Stage
So, before you start, it is essential to have all the necessary equipment to execute this project successfully. Many of you already know what you will need. However, if you are a newbie, here are the essentials:
- Sketchbook – if you think of using only pencils, then any sketchbook should be fine. However, if you want to color your drawing with watercolors, oil paints, or markers, make sure to use a sketchbook with thicker paper.
- Pencils – Since you will need to start with a sketch, an HB pencil will be the perfect choice, and for the shading, you can choose B pencils; the higher the number, the darker the shade. You can always choose to sketch and draw with coal if you have worked with it before.
- Eraser – Since there are many different types of erasers, there is no right or wrong answer here. However, the most commonly used is a kneaded eraser which can also be used to sculpt out the shading (this one is also the best for drawing with coal). A regular pencil eraser will also work if you only use pencils.
- Ruler – A ruler is absolutely optional. However, you can use one if you need more time to practice pulling straight lines when sketching out the placements of one face.
Choosing a Model for Your Portrait
Once your materials are all set, you can choose your model. You can opt for a live model, as in someone sitting in front of you and posing, a family member, a friend, or even a stranger on the street.
Another option would be to choose a photo on your computer and draw that instead. Remember that the person should have shadows on their face instead of selecting a person under a white light with little to no shades.
If you are a beginner, it might be easier to draw a live model since the shadows on a person’s face are different than when drawing from a picture, and you will be able to see how deep they run.
Step 1. Sketching Out the Shape of the Head and the Angles
Once you have chosen your model, the next step is sketching the head under the angle the model is posing. This can be whichever angle you feel would be the best for you. Whether it is frontal, to the side, a bit upward, or even downward, like celebrities doing Kubrick’s stare.
Now that you have that setup, let us lay out the base.
- Measure the length and width of the head – You can do this by using your pen or a paintbrush and determining how many widths the length of the head contains. Larry Withers explains the different measuring techniques perfectly in this video.
- Determine the angle – Before laying down the base and the positions of eyes, nose, lips, and the rest of the details, you need to determine the angle. If you choose a model with its head slightly to the side, try determining what is visible and what is not. Are the eyes the same size, or is one smaller? Are they both visible in the same measure or not?
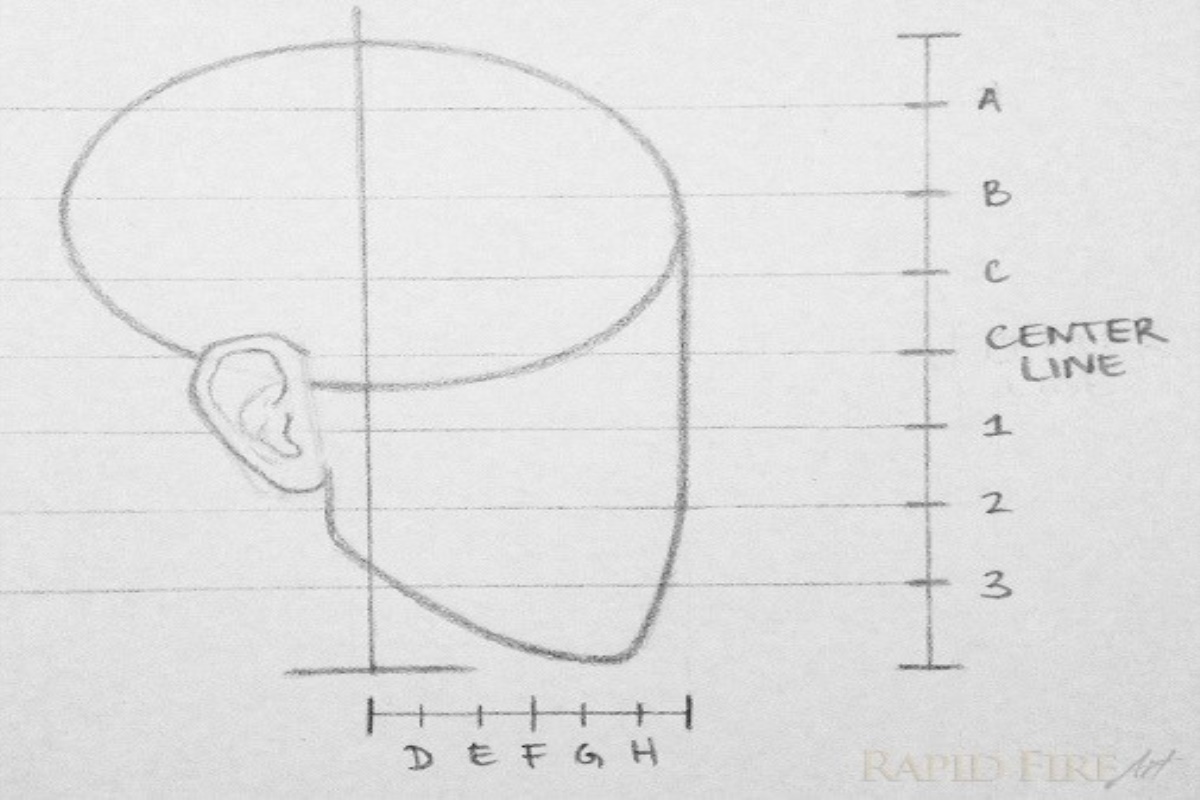
- Draw a ruler on the side – If you are unsure how to divide the face accurately, you can draw a “ruler” on the side of your sketch to help you in your placements. It should look something like this
4. Sketch out the head – Once you have all the previous steps set up, you can proceed with sketching out the shape of the head. It is important to remember that humans have different head shapes, and you cannot simply copy what you saw in a sketchbook or online.
5. Determine the shape of the jaw – If your model is a man, they usually have more angular, pronounced jaws. We all have different face shapes, so stay true to your model.
Step 2. Using the “Ruler” To Place the Hairline, Brows, Nose, Eyes, Lips
The correct placements are what can make or break a professional portrait. In the beginning, many artists experience difficulties drawing portraits because they draw precisely what they see, but is that the case?
Our eyes can play tricks on us; what we see might not be how it will appear on paper. This is precisely why carefully measuring and setting everything should be of utmost importance.
Have you tried drawing a portrait that ended up looking droopy and nothing like the person you were attempting to draw? Believe us. It happened to us as well.
The biggest frustration is when you attempt to draw someone’s portrait, and that person looks more like a relative than the actual model, which is why the next step will help.
Step 3. Drawing the Eyes, Nose, and the Lips
They say the eyes are the windows to one’s soul, and for a good reason. The eyes tell us a story of one’s character, their life and make up a large portion of one’s facial expression.
When we say that someone has beady eyes, that means their eyes are small, but the term is usually used with a negative connotation, as in evil eyes. This is why; if someone does, in fact, have small eyes, and you draw them bigger, doe-like even, it will completely change their facial expression.
The nose comes in many shapes and sizes, whether angular, more prominent, wider, or thinner. Is it in the shape of a button or more like a bird’s beak? You need to pay attention to these characteristics if you wish to draw a portrait realistically.
The nose will almost always be the same size as the ears, so once you have determined the length of it, you can sketch your ears.
As for the lips, they are the easiest to draw. Whether someone has fuller lips, thinner lips, or a bigger upper lip, or bottom lip, you can follow this tutorial and draw your perfect lips in a few easy steps.
Step 4. Sketching Out the Hair, the Brows, and the Ears
As the final step, sketching our hair and ears should be the easiest. The hairline should start approximately in the middle of the circle you started with when making your head shape.
When it comes to the ears, as mentioned before, more often than not, they will be the same length as the nose. They are also the easiest part of the face you can draw.
The brows should follow the brow bone. For this, you should know your human anatomy well. You can look at a skull or even feel the brow bone on your face and determine the placement. They shouldn’t be too high on one’s face unless the person doesn’t have natural brows and draws them on higher.
Step 5. Shading
There are many shading techniques you can use. However, artists’ most popular shading methods are hatching and cross-hatching.
These will allow you to make very light and ”fluffy” shades as well as harsher, more compact shades where the light almost doesn’t reach the area of the face at all.